Showing posts with label Card Stock Patterns. Show all posts

Thursday, April 17, 2014

S'more Cookies in a Jar

I went searching online for a recipe using peeps in a cookie recipe.  I have previously made a chunky chocolate version of this for shower prizes.  I found a Pinterest post at this blog. Go here to see the original   I don't have the machine she uses that cuts shapes, so I built mine from clipart which you are welcome to use.  On another post this morning, someone mentioned the waltograph font.  I downloaded it for free from www.dafont.com.    The recipe at  Michelle's website in the link above does not use any flour or other dry cookie ingredients.  Since the chunky chocolate cookies are a given, I decided to go with what I know works.

I didn't want to give the young adults coming for Easter a lot more candy.  But, I thought that they'd like to make these cookies sometime, and there IS candy in them.  

My cookies use cake mixes.  I am using quart size jars, so  I measured exactly and they use 1 cup + 1/3 cup + 1/2 cup of the cake mix.  I replaced the 1/2 cup of cake mix in the above recipe with crushed graham crackers.  I could only find pink peep bunnies.
Below is the photo from the above web site to give you a visual image of the jar.


Here are the jars I made with their labels (recipes) on them.   Since I made twelve of them, I am going to give you the amounts of ingredients I used.  In the post I got the idea from, she had her peeps at the bottom of the jar and used eight.  I put my peeps at the top of the jar and only used six.

  • I used one quart jars. I put 1/2 cup of Nestle chocolate chunks (11.5 ox bag) bottom of each jar.  It only took two bags to fill up the 12 jars.
  •   I used 5 boxes  of cake mix for 12 jars.  (2 boxes will do 5 jars).
  • I put 1/2 cup M & M's in next.  1 large bag filled 4 jars.  I used 3 bags.
  • I crushed up 1/2 cup of graham crackers (not finely) and used three sleeves.
  • I put 1/2 cup brown sugar in next.  One box filled 8 jars.  I used 1 1/2 boxes.
  • I put 6 peep rabbits in next.  They come 12 to a box.  I used 6 boxes.
  • I filled the space in the middle of the peeps with 1/2 cup chocolate chips. The bag was 11.5 oz.  One bag filled 4 jars.  I used 3 bags.   
 I  am giving mine to my daughters, nieces, and nephews.   I wish I had known ahead of time to buy the fabric squares.  But my jars are going inside insulated lunch sacks I got the kids.  Very practical.  Last year I gave them candy inside Tervis Tumblers.  They're all ready for a picnic or beach trip now.  I'm ready for a trip myself.  At least it's stopped snowing on the East Coast and they're not calling for rain this weekend.  I told the kids that if they didn't want to search for eggs, I'd give them each a square of Mr. Clean Magic Eraser.  They could hunt for finger prints.  The person with the dirtiest square would win a prize.  One of my nieces actually thought this was a good idea.  Ha ha.  

Wednesday, April 2, 2014

Pirate's Boat, Hat, and Map for Pirate's Day at School


     I bought a new camera to take blog photos, but I haven't figured it out yet.  They still come out blurry.  But...we are making over 85 pirate boats with the first graders at school for the 130th day of school.  I have another post where it shows you how to make one out of a pizza box.  If you want to see it go here to see cardboard boat
       But, I couldn't do that with four first grade classes.  I worked and worked and worked on a pattern, so that the pieces would all fit on on 8.5" x 11" piece of cardstock.  I removed the color from the previous pieces I made to glue onto the cardboard.  I added more windows and cannons.    Why?  Because I made up a math counting sheet where all the answers add up to 130.
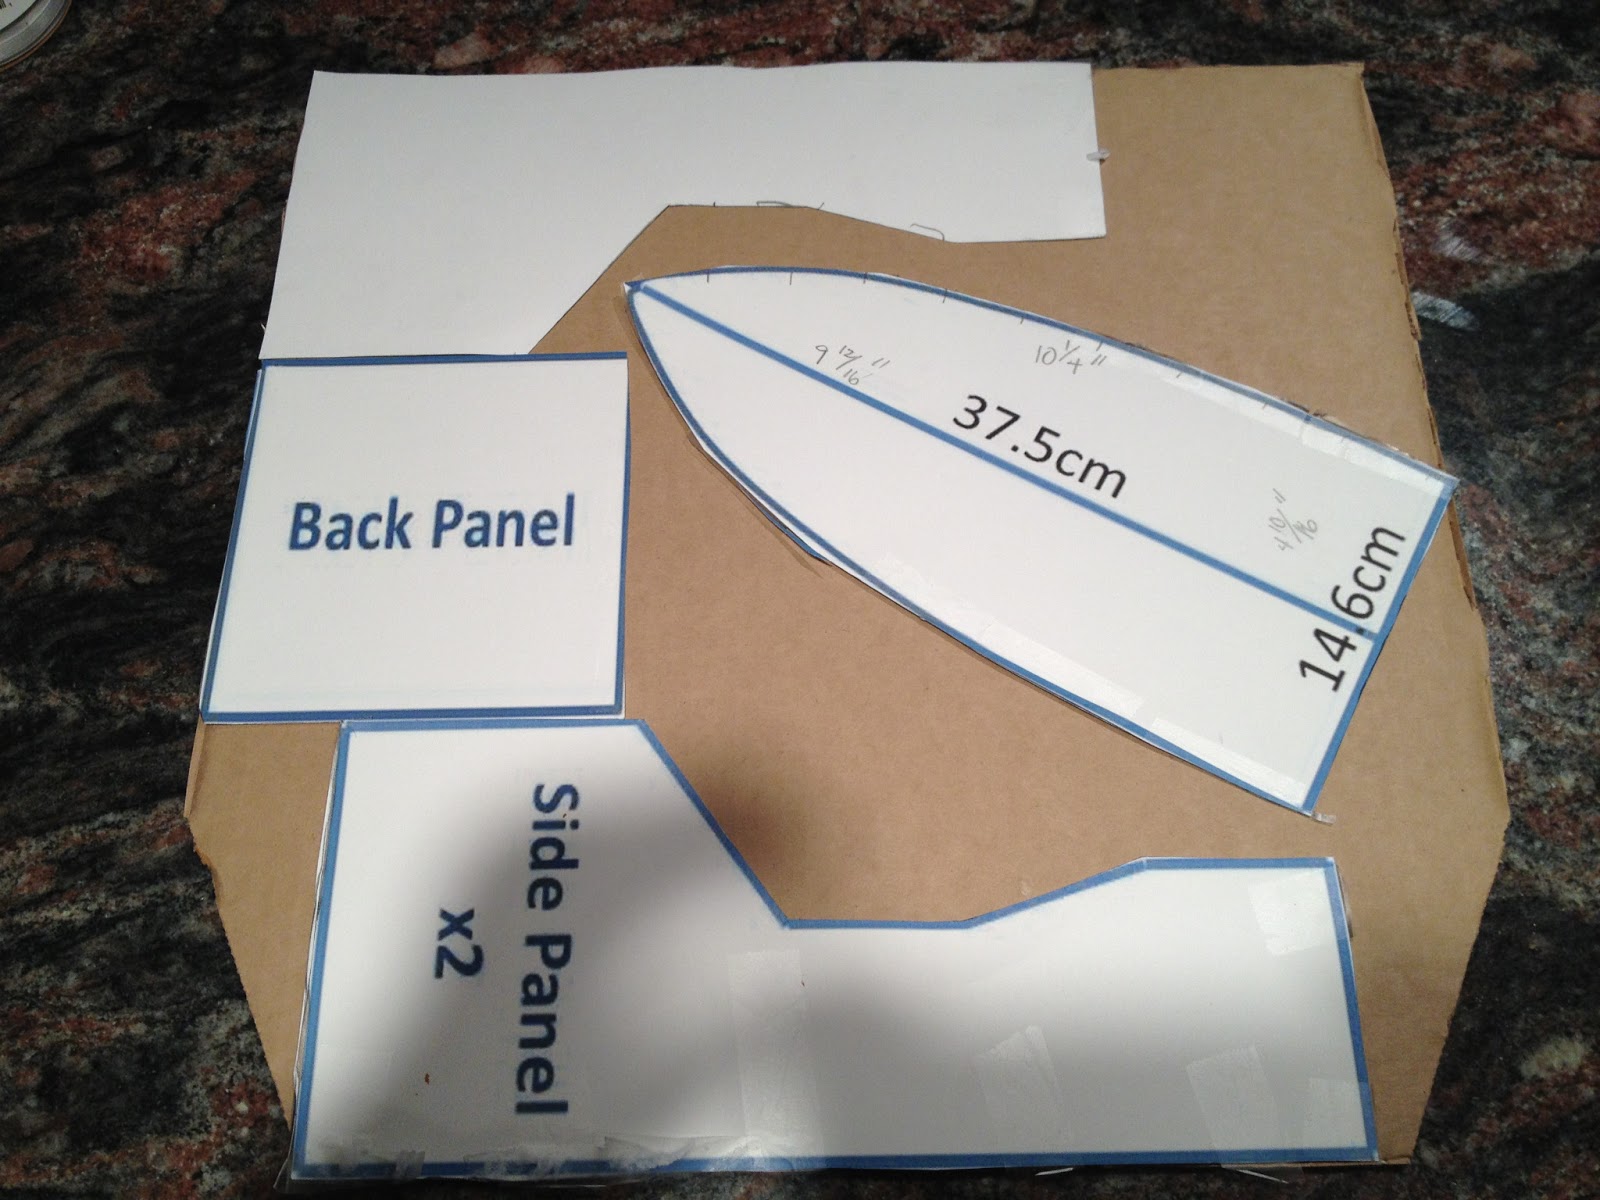
     There are 66 square window panes, 12 canons, 5 railings, 11 windows, 35 spindles, and 1 bow on the boat.   Of course, you could ask other questions to add up other things.


After getting so close in pattern making 101, I decided I had to have a bigger piece of paper.  So, I went up to the 11" x 17" size.  I know they have those sizes at school, but they don't normally have cardstock in that size at office supply stores.  Kinkos might.
I knew my husband's office did.  They use it for the front of  brochures.  

If you are looking at the bottom of the pattern, do not worry about the missing lines.  Those are flaps that tuck behind the back piece.  Just cut along the boxes as if the lines were there.  Cut out the entire outside of the shape.  Also cut out the two narrow triangle spaces on both side of the back piece with the three windows.  At the top, make a small cut to separate the two flaps at the bow.

Because you are folding the paper up along the sides of the large triangle which makes the bottom, you can do this along the edge of a desk or table.  Then fold up the three back boxes.  With the flaps turned up, use a glue stick and rub it along the plain flaps and fold those over each other.  Fold the back up and it will stick to the top flap.  Fold the two front flaps in, glue, and stick together.  The teachers were delighted that it was such and easy project.  The team ordered 18" dowels from Amazon.com.  We are going to write pirate stories on the sails.

 If you punch a hole in the middle of the top and bottom of each sheet, it should slide right onto the dowel. This will be printed on 8.5" x 11" paper.

I love, love, love this clipart

Landscaped lined sail with smaller more lines for eager writers
If the kids want to make patterns on the sails, I would have them write their stories in their journals, then do final copies in INK on the sails, so that they could lightly color over their printing. Or they could print on one side and color the back.


 I tried to hold a dowel up with clay the team already had, but it did not work.  One of the teachers suggested gluing marshmallows into the boat.  I have thin styrofoam sheets I might cut up.  If you have a suggestion...please leave a comment.  I could use your ideas.
 
Surprise:  there's an extra.  I found a pattern for a pirate's hat on Pinterest.
8.5" wide if you're printing it


I folded a piece of 12" x 18" black construction paper in half (the fat way) and printed out the pattern so that it fairly fit the one half. (I had to make it smaller than an 8.5" x 11" sheet of paper).  When I cut it out by placing it on the fold, i cut the slit open in the middle.  It fit exactly on my head with a front and back.  It's an awesome design. I  AM going to make them in foam for the Fourth of July, but add ribbons to them.,  but since we are making 85 of them, it was too expensive. I am using sentence strips for the bands. We can just measure them around each student's head and staple. So...I folded ANOTHER piece of 12" x 18" construction paper in half the skinny way.  I cut the first hat in half by continuing the slit until I had just a front and back piece.  I put that piece on the second construction paper and enlarged it with a pencil freehand so that it was 2" bigger on the top.  This way the sentence strip doesn't show. 
                 I edged the hat with a white crayon.  You could have the kids paint the edges or glue them and sprinkle white/colored glitter on the edges.

 I glued the two hats together ONLY on the ends, then slipped it over the sentence strip hand and stapled the paper to the bottom to the sentence strip band.

You only need one skull and bones per hat.  The kids can color the scarf any color they choose.  Just glue it on the front of the hat.  I ordered turkey feathers from Amazon.com in bulk.  Just like Yankee Doodle stuck a feather in his hat, so will we.  By the way, when they called him a "macaroni" it meant he was a "dandy."  I love telling first graders about that expression.


    I used two lengths of 6 foot brown paper glued and taped together to make the map. I already had the pirate icons from the office Margarita/Pirate party last September.  So I enlarged them.  It was my hubby's idea to use the blue painters tape (1/2") to make the 12" square boxes.  I numbered the bottom row 1-6 and the left hand side A-F to make a grid.  I will explain the the first graders how to use the grid to find things on a map.  
    I am also going to tell them a story about how the island was overcome with frogs and the pirates had to figure out a way to deal with them.  Since we've discussed simple machines, I am bringing in my two stomping catapults to have them fling bean bag frogs onto the map.  They will earn points for their class by landing on the icons--which are worth different points.


Saturday, October 5, 2013

Toy Town Printables

Print each building out on 8.5" x 11" cardstock.  If the building has the solid colored bar (roof) horizontally in the middle of the design, print out in portrait.  If the building has the solid bar (roof) at the top of the design (see last picture), print out landscaped.  Some of the buildings are tall, and some are short. The heavier black lines tell you where to fold. When you've folded the sides of the box, snip the four short lines on the sides in order to over lap and glue the box together.  I just used glue sticks. 


Thursday, June 20, 2013

Toy Car Roads

I did Boom Town again with the entire first grade, but this year we did it on the floor of the gym.  It was so BIG.  With 120 buildings and 120 houses, the kids had a ball.  They got to take their shoes off and walk through their town.  I purchased a huge lot of matchbox cars on ebay. I had a vehicle to match most of the kids' businesses.   For the past two years we had done this on table tops.  (Search blog for Boom Town). I had to cut out the kids in the above photo, so it is not the best shot of the event.

After everything was over, I always try to reinvent the wheel.  The teachers and I started coming up with the idea of each child having a poster board laminated mat the size of his desk.  One side would be used for the 125th day of school tea party.  The other side could already have the roads on it.  The kids could push their desks together to connect their roads to make their town.  But...the roads would have to be positioned just right to make a variety of layouts.

I started unfolding napkins on my kitchen table (see car pile on left). Then, I began to like the size of each napkin.  After covering empty smaller food boxes with my building patterns, I started thinking again.  What if.... I just used the box pattern I made last year and printed the buildings right from the pattern onto cardstock???


I cut out poster board in 11" x 11" squares.  I did this because printable cardstock comes in 8.5" x 11" sheets.  When you print there is an empty border of 1/4" all around. So, I was pretty close.  I used a  black brush sharpie to fill in the empty space to make the roads exactly 11".

 Here are my nephews playing the 11" x 11" squares I made on green poster board for them.  I laminated them with a roll of press on sheets that are not as sticky as contact paper and easy to use.  I got the rolls at Office Depot.  When I gave it to them the five year old said, "This is the BEST present ever."  The 2.6 year old said, "Varoom. Varoom."


 I used up an entire black cartridge trying to tweak the roads to be small enough to fit the smaller town, but wide enough for the small cars to fit them.  You may download my effort and print it out portrait.  Stretch it to fit the 8.5 x 11" cardstock.
  As you can see from the photo above, I made a cross right in the middle of the square.  That way, the t's form city squares.  BUT...wait... on the back of the poster board squares are just single roads.  The kids might want to have a long stretch of road going out to the country.  Then I worked really hard to get a curved piece.  This would also be glued to the back of one of the t road squares.  I put the connection in the middle.  A few of these placed together would give the kids more room in the suburbs.  

The advantage of making a bunch of these squares for your kids would be that they fit in a canvas tote bag.  I am going to laminate my set for my nephews.  Yes, I am spoiling them with their own set of cars to go with their town.  I will probably make their set on green poster board and add graphic bushes and trees.


Here is one of the buildings.   You can print it landscaped stretched to full paper size on CARDSTOCK.  The black bar is the roof. Fold along the horizontal edges of the roof. The vertical double lines are the side folding lines.  Make four cuts from each edge along the roof bar edge to the double vertical lines to create the two tabs for the box.  Then simply glue the two plain green boxes to the boxes with the bathroom doors.  You have a building.  
IF YOU SUCCESSFULLY MADE THIS BOX, LEAVE A COMMENT.  I WILL EMAIL YOU 
MORE TOWNS AS A REWARD.  FOR FREE.  YES, I SAID FREE. NO, I AM NOT KIDDING. 

Thursday, April 18, 2013

Cardboard Pirate Ship


Working model of Pirate Ship.  I will update photos with completed ship and sails at a later date.
     I am planning for the office's annual Margarita party to have a shipwrecked theme this year.  Since desert islands usually have pirates, I started searching for pirate themed clipart and boat patterns.  I came across a simple boat pattern that I enlarged below. The boat is 10.5" long and 5" high at the back.


     I needed a quick piece of cardboard to make a model.  I looked at the empty Domino's pizza box on the counter.  The lid was perfectly clean.  I wondered if the four pattern pieces would fit on the top part.  As you can see from the photo, they did. Below are the two jpegs for the pieces.  Just print the side pattern twice.  Don't change the size.  Print them on cardstock 8.5" x 11."  I have already adjusted the pieces to make the boat a nice size for a centerpiece, picnic lunch, or food server.   
     I made the mistake of putting the print side of each piece inside the box.  You need to put the print side on the outside of the boat.  WHY?  Because you want the inside of the box to be just plain brown.   After you have cut both the cardboard, use tacky glue to put the pieces together.   Because I wanted to hide the corrugated edge of bottom sides, I added the glue to the edges of the bottom piece. Bend the cardboard sides so that they aren't too stiff to glue along the curve.  Use masking tape to hold until dry.  You could paint these if you are making multiple boats for a party.  Or...you can print out the back piece 8.5" x 11 on CARDSTOCK.  I have already sized the graphics to match the cardboard patterns.  Print out the side of the boat graphics on 11" x 8.5."  I landscaped the side graphics.  I printed the second side as a mirror image. Glue the side graphics on first. Glue the back of the boat graphic on last.  I made the back graphic bigger so that you could overlap it around the corners.
     Note: Dominos will either give you empty boxes or sell them to you inexpensively.  Their cardboard can be cut with scissors.


 I will be updating this post with final pictures.  I am making a mast with a small block of wood and one large dowel and two smaller dowels. The  block of wood will help the mast stand up by giving weight to the dowel.  I drill a hole to match the size of the large dowel and glue it.  The other two dowels are the cross poles for the mast.  See photo below.  I have just updated my patriotic version of the boats for the Fourth of July picnic tomorrow.  I wanted lightweight portable centerpieces.  Just for fun, I am going to fill them with cookies.
                                          
If you want Pirate masks to go along with your theme, I have the patterns for you here.


Most of the pirate ship images I found have red and white striped sails.  I will probably just lash the side poles to the main mast with twine.  Then I will just tie the four corners to the side poles.  A pirate flag at the top of the pole, and you are good to go.  

Saturday, June 16, 2012

Napkin and Silverware Holder


Most of you probably remember folding an origami cup.  The kids at school love to make these and drink water from them.  After the success of my last baby shower boats, I was thinking ahead of the beach party I am throwing for my daughter's birthday.  I started researching origami buckets, because when I went looking for small plastic buckets, they were expensive.  Then my mind went to these cups, but making them bigger.


So, I taped two pieces of pink cardstock together.  Then I folded one side down to make a large triangle.  I cut the extra cardstock away to have a large box.  I folded my new large box using the directions above.  It resulted in an oversize cup.  I put the cup down on the table and squashed the bottom until it was big enough to hold a bottle of water.  i added a napkin and silverware to show you that they fit just fine.  

You could make these in different colors or glue your favorite scrapbook paper to the cardstock.  If you want a fancier one, I pinned a video of an origami box made with two paper boat folds.  I had to watch it four times until I understood, but she basically gave pretty good directions.  Go to my Parties board.